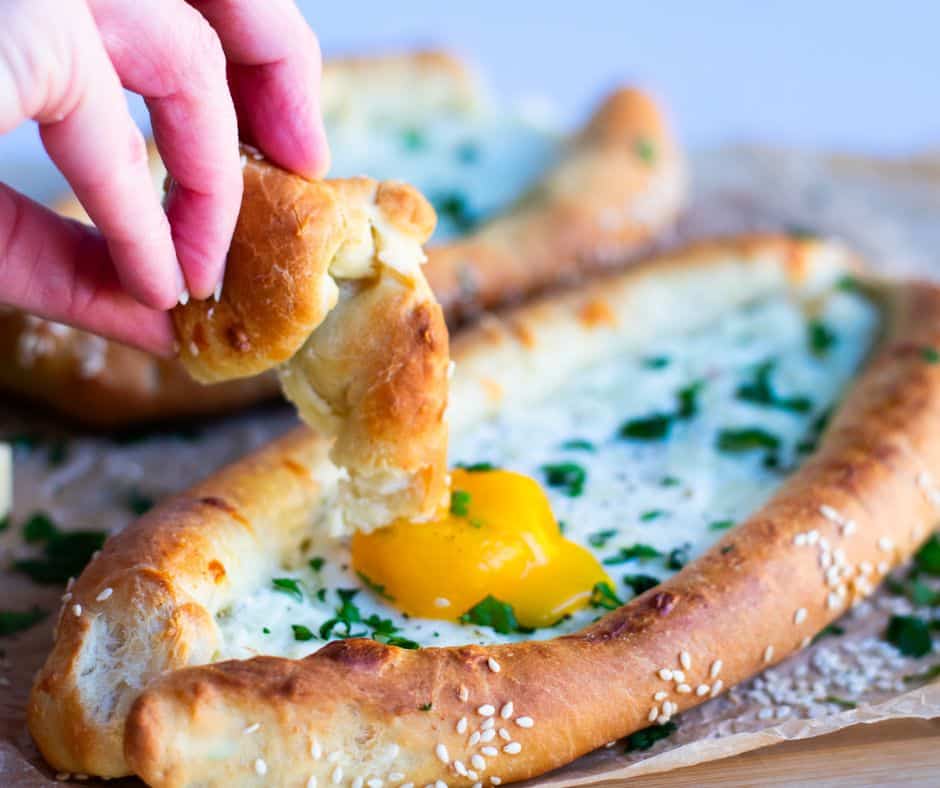
The magic happens in the oven, where the bread is baked until the crust is golden-brown and crisp. The heat transforms the cheese into a gooey, molten masterpiece while the egg cooks to perfection, creating a symphony of textures and flavors in every bite.
If you’re new to baking bread, there’s no need to feel intimidated by yeast. Think of it as just another ingredient you’re incorporating into the dough. The real miracle unfolds during the “rest” time. So, take a deep breath and let time work its magic in transforming basic ingredients into a delicious, homemade Khachapuri Adjaruli.
Perfect for brunch, lunch, or dinner, these Adjaruli Khachapuri are a great simple meal for any time of the day.
What is Khachapuri?
Khachapuri is a warm, boat-shaped yeast bread stuffed with multiple kinds of cheese and an egg in the center. Adjaruli Khachapuri: The Khachapuri from Ajara is the variation we are making today. Traditionally, the bread is also served with a piece of butter on top! YUM
Why You’ll Love This Bread
- Easier than you ever imagined
- Chewy with a slightly crisp crust
- Warm, gooey cheese filling with a runny egg
- It’s a dish that not only tastes great but also looks impressive.
Ingredients Overview
All-purpose flour: I use all-purpose flour, but you could use bread flour or a combination of bread and all-purpose. Remember that bread flour has a higher protein content and will give your bread more structure.
Water: It’s best to use water between 100°F and 110°F (38°C-43°C); it helps to activate the yeast. If you don’t have a thermometer, don’t overthink the water temperature. You want the water warm. Not hot. Not cold. Not freezing. Just warm.
Yeast (active dry yeast ): Active dry yeast needs to be bloomed in liquid before being used to make dough. However, it is not necessary to bloom newly purchased yeast. Instead, they can be added directly to the dry ingredients.
Olive oil: Olive oil has a rich and fruity flavor that can enhance the taste of the dish.
Sugar and salt: Flavor.
Cheese selection: You can experiment with different cheeses to find the combination you like best. I think that the best combination includes at least one soft cheese and one melty cheese. Experimenting with different cheeses is a great way to customize khachapuri to your taste preferences, some options are: Sour cream, Ricotta, Mozzarella, Havarti, Mascarpone, Feta, and Farmers cheese.
Eggs: One (or two) per boat.
How to Make Khachapuri
- Make the dough. The dough should be soft and stretchy but not at all sticky.
- Let the dough rise: Allow the dough to rise in a relatively warm environment for 90 minutes to two hours or until it doubles in size.
- Shape. Separate the dough into 4-6 equal pieces and shape into boats.
- Fill. Place 2-3 tablespoons of the cheese filling into the center of the dough boat.
- Bake for 10-15 minutes until the crust begins to brown and the cheese is melted.
- Crack an egg into the middle of each boat.
- Bake until the eggs are partially set (3 to 8 minutes).
- Garnish. Sprinkle salt, pepper, and parsley. Serve immediately. Add a piece of butter for traditional Khachapuri once it comes out of the oven.

More Recipes You’ll Like
Spinach Shakshuka (Green Shakshuka)

Khachapuri Adjaruli (Georgian Cheese Bread)
Description
Equipment
- A standing mixer with a dough hook
- Baking sheet
- Parchment paper
- Rolling pin
- Pastry brush
Ingredients
For the dough:
- 3 and 1/2 cups (500g) all-purpose flour plus a little more for dusting
- 1 Tablespoon (10g) active dry yeast
- 2 Tablespoons (20g) granulated sugar
- 1 and 1/4 cup (300ml) lukewarm water
- 1/4 cup (60ml) olive oil plus a little more for greasing
- 1 Teaspoon salt
For the filling:
- 1/4 cup shredded Mozzarella
- 1/4 cup Ricotta cheese or Cottage Cheese or Mascarpone
- 1/4 cup light or regular sour cream or Feta
- 4-6 eggs
For garnish
- salt and pepper to taste
- a handful of sesame seeds
- a handful of chopped parsley
- optional 4-6 Tablespoons unsalted butter
Instructions
Prepare the Dough:
- Put flour, yeast, and mix in the bowl of a standing mixer with a dough hook for one minute.
- Add sugar, water, olive oil, and salt and process at low speed for 7 minutes or until the dough becomes smooth and elastic. Scrap the sides of the bowl occasionally with a rubber spatula to ensure all ingredients are incorporated.
- If the dough is dry, add a teaspoon of water, one at a time until the dough comes together. The dough should be smooth, elastic, and not sticky.
- Transfer dough to a lightly floured surface. Using floured hands, knead the dough for 3-5 minutes. You should have a smooth ball of dough. If the dough is super soft or sticky, you can add a little more flour.
- Grease the dough with a little bit of oil, cover it with a kitchen towel, and let the dough rise until doubled, about 90 minutes (place the bowl somewhere warm).
Shaping and filling the Khachapuri:
- Preheat oven to 425°F/220°C.
- Separate the dough into 4-6 equal pieces.
- Mix Mozzarella, Ricotta, and sour cream in a small bowl.
- Line a baking sheet with parchment paper; set aside.
- Roll each dough piece into a thin circle using a rolling pin on a lightly floured surface.
- Using your fingers, roll and press two opposite sides of the circle a few inches into the center, building sides up, then press and pinch the narrow ends together to form two points- creating an oval boat with an eye-like shape. Make sure to seal the edges of the dough boat properly to prevent the cheese from leaking during baking.Place the Khachapuri on the prepared baking sheet.
- Place 2-3 tablespoons of the cheese mixture into the center of the dough boat, spreading it into an even layer.
- Brush the sides of Khachapuri with water and sprinkle them with sesame seeds.
Bake:
- Bake Khachapuri in the oven for 10-15 minutes until the crust begins to brown and the cheese is melted.
- Remove pan from oven.
- Crack an egg into a small bowl. This step ensures that you can easily slide the egg into the prepared boat without any shell fragments.
- Hold the egg close to the surface of the bread and gently tip the bowl to let the egg slide into the center. Repeat for additional eggs. If you're particular about the appearance, you can separate the eggs and use only the yolks.
- Drizzle or brush a tiny bit of olive oil on top.
- Bake until the eggs are partially set (3 to 8 minutes), depending on how firm you want them. Keep an eye on the Khachapuri while baking to avoid overcooking the egg yolk. You want the yolk to be runny but cooked.
Garnish:
- Remove the pan from the oven and sprinkle salt, pepper, and parsley. Serve immediately.
- Optional - place 1 tablespoon of butter on top of each egg yolk.
I love it with butter
Butter takes it to a new level
Love it
thank you
Came out great!!!!
yay!
Video how to shape boats?