
Hanukkah Chocolate Bark makes the perfect gift for someone special or as something to snack on over the holiday. Who doesn’t want homemade treats?
How to Make Chocolate Bark?
It is a good idea to prepare your ingredients in advance.
First, melt your chocolate: The easiest way to melt white chocolate is in the microwave, but it can also be melted in a double boiler on the stove.
Once you melt the chocolate, you just have to spread it into a thin layer on parchment paper and add the toppings.
You could use any pan or baking sheet size you want. Just make sure that there is room to spread your chocolate in a nice even layer.
Let the chocolate cool and harden, then simply break the bark into pieces with your hands.
Ingredients Overview
The recipe makes about 20 barks~ 5 small gift bags. You can easily double or triple the recipe.
White chocolate: I definitely recommend using a high-quality chocolate bar. Another option is candy melts or wafers. Don’t use chocolate chips if you can help it; they have some additives and tend to be a bit more challenging to work with.
Chocolate coins (gelt): Milk or dark chocolate. You can find chocolate coins on Amazon, World Market, some grocery stores in the Kosher aisle, Target, and Trader Joe’s (World Coins).
Hanukkah sprinkles: I found these super cute Hanukkah sprinkles on Amazon, but any blue-silver-gold sprinkles will be great for this Hanukkah bark. Also, try to use sprinkles that won’t lose all their color, like Jimmies, Quins, and sugar pearls.

How to Store Chocolate Bark?
Store in an airtight container in a cool, dry place, ideally less than 70ºF/21ºC. The bark will last for several weeks and doesn’t need to be refrigerated.
If you have to store it in the refrigerator, make sure it’s in an airtight container to prevent moisture and smells from spoiling the chocolate.
Gift It: This makes a great homemade Hanukkah gift! Gift it in a cute bag with a ribbon on top.
More Recipes You’ll Love
Crispy Potato Latkes (Not Just for Hanukkah)
Sufganiyot- Israeli Hanukkah Doughnuts
Hanukkah Chocolate Bark
Description
Equipment
- Chef knife
- Parchment paper
- Offset spatula optional
- Cellophane Bags optional for wrapping
Ingredients
- 2 bars 8.8 oz (250g) white chocolate
- 4-6 chocolate coins, unwrapped
- Hanukkah sprinkles or any sprinkles
Instructions
- Line a baking sheet or a pan with parchment paper. Using a sharp knife, finely chop the white chocolate.
- Place chocolate in a microwave-safe bowl. Heat chocolate in 30-second intervals, stirring between each, until melted and smooth.
- Spread chocolate into an even layer on the prepared pan. Evenly distribute the chocolate coins on the melted chocolate.
- Top with sprinkles.
- Refrigerate for 30 minutes or let it cool at room temperature or until hardened.
- Once completely set, remove the parchment paper and break the bark into pieces.
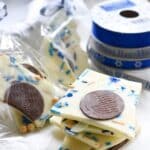
- Optional: Carefully slide 3-5 chocolate barks into an individual cellophane bag. Use a twist tie or ribbon to seal the bag.
What a fun idea!
thank you
What size are the cellophane treat bags you have pictured in the recipe?
5 by 7 inch
so easy
Made it without the sprinkles
so easy!
Great for gifting
love it
great idea