You might think baking your Sweet Challah Bread can be too much of a hassle, but the truth is that baking Challah is a lot easier than it seems. Although the entire cooking time could seem long, most of that is the hands-off proofing time.
For my “The Complete Challah Guide” FREE ebook, join my mailing list here.
What is Challah?
Pronounced Challah/ḥallah, plural: challot/ḥalloth/khallos, Hebrew: חלה
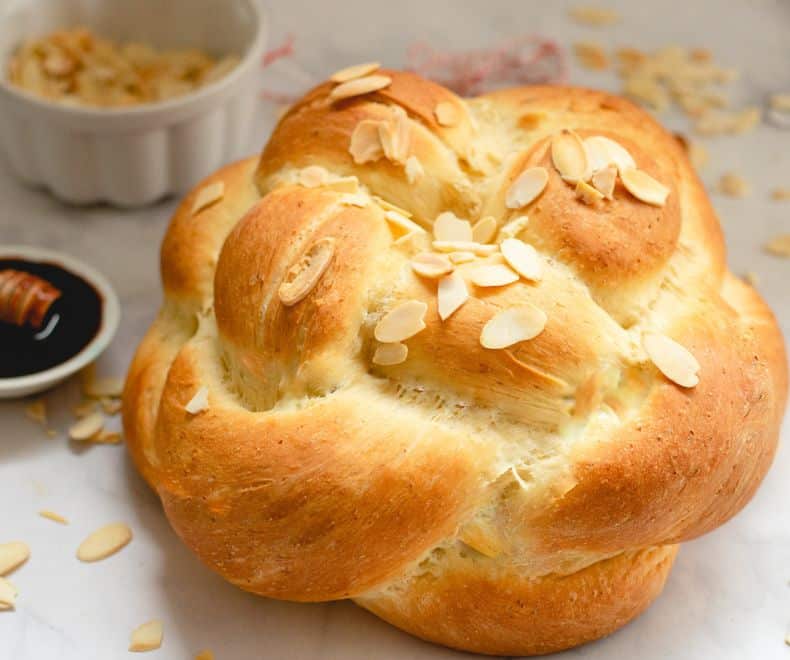
Challah is the most iconic and uniquely Jewish food. It is a rich braided bread served on Shabbat and holidays; like brioche, the bread is slightly sweet and wonderfully soft inside.
Ingredients Overview
*The full recipe is in the recipe card below!
Before you start baking using this Challah Recipe, measure and prepare your ingredients so the cooking process will go smoothly and easily.
All-purpose flour: I use all-purpose flour, but you could use bread flour or a combination of bread and all-purpose. Remember that bread flour has a higher protein content and will give your bread more structure. I strongly recommend sifting the flour; it will result in a more delicate dough with a more significant volume.
Water: It’s best to use water between 100°F and 110°F (38°C- 43°C); it helps to activate the yeast. If you don’t have a thermometer, don’t overthink the water temperature. You want the water warm. Not hot. Not cold. Not freezing. Just warm. The proportion of water in bread dough corresponds to how hydrated, or wet, it is.
Yeast (active dry yeast ): Active dry yeast needs to be bloomed in liquid before being used to make dough. However, it is not necessary to bloom newly purchased yeast. Instead, they can be added directly to the dry ingredients.
Eggs: 1 large egg + 1 egg yolk
Butter: Unsalted.
Can I knead Challah By Hand?
Absolutely!
There is no reason not to make Challah because you don’t have a mixer. Kneading by hand will yield wonderful results; it will just take a little more time. The advantage of using a mixer is saving (human) energy and multitasking while the mixer works. For making Challah, we will be using the hook attachment.
How to Make Sweet Challah Bread?
Bloom the yeast: Subtract about ¼ cup of warm water called for in the recipe. Add one teaspoon of sugar and the yeast, and gently stir with a spoon. Allow the yeast to feed off the sugar and begin to bubble (If it doesn’t bubble after 5 minutes, your yeast may be expired) let it bloom for about 10 minutes.
It is not necessary to bloom newly purchased yeast. Instead, they can be added directly to the dry ingredients.
Prepare the flour: Sift the flour and measure 3 ½ cups (500 grams). Always measure flour AFTER sifting.
Make the dough: In the bowl of a standing mixer with a dough hook, put flour and yeast (or in a large mixing bowl if kneading by hand) and mix/stir for one minute. Add sugar, melted butter, eggs, and mix for one minute. Gradually add water, I always like to start with 1/2 cup and add as needed to form a dough. Add the salt and knead for 2-3 minutes. If the dough hasn’t come together, add a few drops of water. The dough will smooth out during kneading. Scrap the sides of the bowl occasionally with a rubber spatula to ensure all ingredients are incorporated, and knead for 8-10 minutes. Challah dough should be soft and stretchy.
If the dough feels sticky, grease it with a little bit of oil instead of adding more flour.
Let the dough rise: Place the dough into a greased bowl and cover it with a towel. Let it rise in a warm place until it has doubled in size.
Braid the dough: Sprinkle a little bit of flour on your work surface. Divide the dough into 3 equal portions. Roll each of the dough portions out into a long rope. Gather the ropes and squeeze them together at the very top. Braid the ropes together like braiding hair and squeeze the ends together when complete.
*There are many options for braiding; watch my tutorials here.
Let the dough rise again: Place the loaf on a baking sheet lined with parchment paper. Cover loosely with a towel and let it rise for about an hour at room temperature.
Prepare your oven: Preheat your oven to 400°F/200°C.
Prepare to bake your Challah: Once the dough is proofed for the second time, brush the top of the loaf with maple syrup and sprinkle with sesame seeds. Bake the loaf for about 25 minutes or until golden brown.
Let it cool before enjoying: Remove from the oven and allow it to cool completely.
Pro-Tips
Weigh all your ingredients and get everything in order so you can follow the recipe exactly.
Mixing the dough: Scrap the sides of the bowl occasionally with a rubber spatula to ensure all ingredients are incorporated.
Water: Because each flour is different, stored differently, and has different absorption capacities, the amount of liquid will almost always change. Even if you always use the same flour, it may be that the flour will absorb more liquid on different days. So, start with half a cup of water and add as needed gradually. The dough should be very soft but not sticky. Dough lacking in liquid will be stiffer and less comfortable to work with.
The first rise: About an hour and a half or until the dough doubles. But that figure can also change radically, especially if it’s particularly cold weather, which will then require a few hours for the dough to increase in size. In summer, it can be much shorter.
Shaping: It is essential to braid the loaf slightly loosely so the dough can rise.
FAQs
Allow Challah to cool completely before storing it. Challah is always best when eaten within the same day of baking. Place in a plastic bag for up to 3 days.
Challah freezes beautifully, and you can freeze a whole loaf or slices. If you are going to freeze your bread, do so on the first day when it is fresh.
Wrap the loaf tightly in two layers of plastic wrap before placing it in a large resealable freezer bag. Press out as much air as possible and stow it in the freezer for up to 3 months.
To defrost, leave the bread out at room temperature. When it has thawed, remove the plastic wrap and rewrap it in foil. If you like your bread warm, pop it into the oven at 350°F/180°C for 10-15 minutes.
Looking for More Jewish Recipes
Chocolate Babka Just Like Bubbie Used To Make
Challah for Rosh Hashanah with Apple and Honey
Sweet Challah Bread
Description
Equipment
- Food scale *Highly recommended*
- Mixer with a dough hook *Highly recommended*
- Instant read food thermometer optional
- Rolling pin optional
- Parchment paper
- Pastry brush
Ingredients
The dough:
- 3 1/2 cups (500 grams) sifted, all-purpose flour I strongly recommend sifting the flour; it will result in a more delicate dough with a more significant volume.
- 1/4 cup (50 grams) granulated sugar
- 1 tablespoon (10 grams) active dry yeast
- 1/2 stick (55 grams) unsalted butter melted and slightly cooled
- 1 teaspoon vanilla extract
- 1 large egg at room temperature
- 1 egg yolk at room temperature
- ¾ to 1 cup (180-240 ml) lukewarm water
- 1/2 teaspoon salt
- oil for greasing the dough
- 1⁄2 cup (75g) raisins or dried cranberries optional
For the topping:
- 2 Tablespoons (30ml) real maple syrup or honey with 1 tablespoon water and a pinch of salt
Instructions
- In the bowl of a standing mixer fitted with a dough hook, (or in a large mixing bowl if kneading by hand) put flour, sugar and yeast and mix on low speed for about a minute.
- Add the melted butter, vanilla extract, egg, and egg yolk and mix for another minute.
- Slowly pour in the water and mix to form the dough. If after 2 to 3 minutes, the dough hasn’t come together and there are pieces of dough at the bottom of the mixer, add a few drops of water.
- Increase the speed to medium and add the salt. Let the mixer knead for an additional 4 to 5 minutes. Scrape the bottom and sides of the bowl as needed.
- Optional: add raisins or cranberries and knead on low speed for one more minute, just until incorporated.
- Transfer the dough from the mixing bowl to a very lightly floured work surface. Finish kneading by hand – stretching, tearing and pushing the dough away from you, folding it back on itself, giving it a quarter turn and repeating. Finally, give it a nice round shape.
- Grease the dough with a little bit of oil, cover it with a kitchen towel, place the bowl somewhere warm and let the dough rise until doubled. It can take 1 to 3 hours at room temperature.
- Separate the dough into equal pieces and roll each piece of dough into a long rope.
- Braid the ropes to your desired shape.
- Line a baking sheet with parchment paper and place the Challah on it.
- Place the pan somewhere warm, cover it with a towel and let it rise until puffed, about an hour.
- Heat the oven to 400°F/200°C. When ready to bake, brush the Challah all over the with the maple syrup.
- Slide the Challah on its baking sheet into the oven and bake for 25 to 30 minutes. The Challah is done when it is a rich golden brown and registers 190°F/90°C in the very middle with an instant-read thermometer.
- Let the Challah cool on a cooling rack. Enjoy!
Notes
- Weigh all your ingredients and get everything in order so you can follow the recipe exactly.
- Mixing the dough: Scrap the sides of the bowl occasionally with a rubber spatula to ensure all ingredients are incorporated.
- Water: Because each flour is different, stored differently, and has different absorption capacities, the amount of liquid will almost always change. Even if you always use the same flour, it may be that the flour will absorb more liquid on different days. So, start with half a cup of water and add as needed gradually. The dough should be very soft but not sticky. Dough lacking in liquid will be stiffer and less comfortable to work with.
- The first rise: About an hour and a half or until the dough doubles. But that figure can also change radically, especially if it’s particularly cold weather, which will then require a few hours for the dough to increase in size. In summer, it can be much shorter.
- Shaping: It is essential to braid the loaf slightly loosely so the dough can rise.
LOVE IT
Thank you
Great recipe my kids loved it
yay
Turn out delicious
yay
Can I make it Pareve?
I suggest this recipe instead
https://mamalivingabroad.com/the-only-challah-recipe-youll-ever-need/
So soft and sweet
so petty
Hi l made this today but had to throw it out your measurement for yeast is way off you gave it for 1 Tablespoon of yeast way too much please correct the amount
Hi, the amount is correct. 1 tablespoon of yeast for 3.5 cups of flour.