Whenever I make this homemade Hummus Recipe, it immediately brings me back to Israel. And I am not thinking about the store-bought containers from the supermarket! In Israel, hummus is a national obsession. There are numerous hummus joints all over the country. Every Israeli has a favorite place, so debates about the best hummus dish can get pretty heated. But there is no arguing that sitting down to a bowl of freshly made hummus in Israel is nothing like the sad containers of supermarket paste you find in the grocery stores.
Note: You can always jump straight to the recipe; however, I highly recommend reading all of my tips and tricks for the best results!
What is Hummus?
Hummus is a creamy Middle Eastern dip or spread made of cooked chickpeas, tahini (sesame paste), garlic, lemon juice, cumin, and salt. It’s rich in healthy fats and fiber and packed with plant-based protein. It is naturally gluten-free and vegan.
So what is Israeli hummus?
Israeli-style hummus has a substantial amount of tahini. Unlike Greek hummus, which is heavy on garlic and lemon, Israeli hummus is all about the tahini. Tahini is the most important ingredient in hummus besides chickpeas, of course.
Call it cheesy…but a good bowl of hummus is made with love.
Ingredients Overview
Dried Chickpeas: Also known as garbanzo beans. Dried chickpeas must be soaked before being cooked. On occasion, you’ll find small rocks or debris mixed in with dried chickpeas. To avoid eating them, rinse the lentils in a fine mesh sieve and pick them over before you cook them. Discard any shriveled lentils in addition to debris.
Where to find dried chickpeas?
You can find dried chickpeas at Middle Eastern stores, health stores (like Whole Foods), spice stores, and major grocery chains (usually in the ethnic food aisle)
Pro-Tips
1 cup of dried chickpeas yields about 2.5-3 cups of cooked chickpeas. I always cook 2-3 cups of dried chickpeas at a time, even when I only use two cups of cooked chickpeas to make hummus. I freeze the leftovers, and then I always have cooked and ready chickpeas to make more fresh hummus.
Can I use canned chickpeas?
Yes, you can! But the best hummus comes from cooking chickpeas from scratch because it makes creamier hummus.
If you are using canned chickpeas, I recommend buying a can of good organic chickpeas. Check out my 5 minutes hummus recipe!
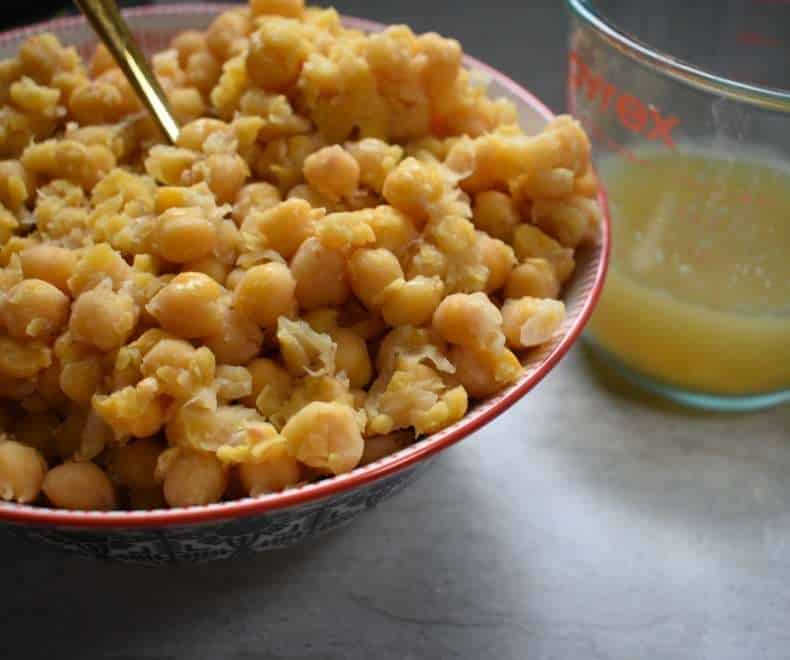
Chickpea Liquid: Don’t skip this – aquafaba (the liquid left in the pot of cooked chickpeas or a can) adds so much flavor to the hummus and has emulsifying and thickening properties.
If you don’t have chickpea liquid, simply use water instead.
Garlic: Start with one clove and add more as needed. Roasted garlic is also good and is sweeter in flavor.
Tahini: Tahini is rich and nutty paste made from sesame seeds. It is essential for adding flavor to the dip and creating a thicker texture.
Fresh Lemon Juice: Fresh lemon juice is just the thing to add tang here.
Cumin: A hint of this warm, earthy, and fragrant spice.
Salt: Just a pinch of salt to your liking. You can always add more.
Baking Soda: Adding baking soda to chickpeas can help them soften and cook more quickly and gives an extra creamy end result.
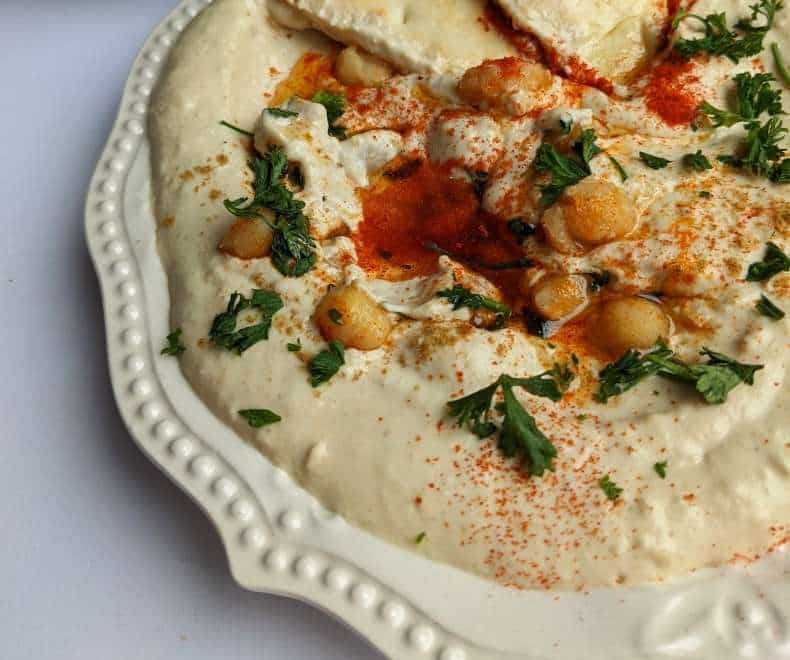
For garnish: An authentic or traditional way to serve hummus is with a swirl of olive oil, a dash of paprika and cumin, and a sprinkle of chopped parsley.
The Best Tips for Super Creamy Hummus
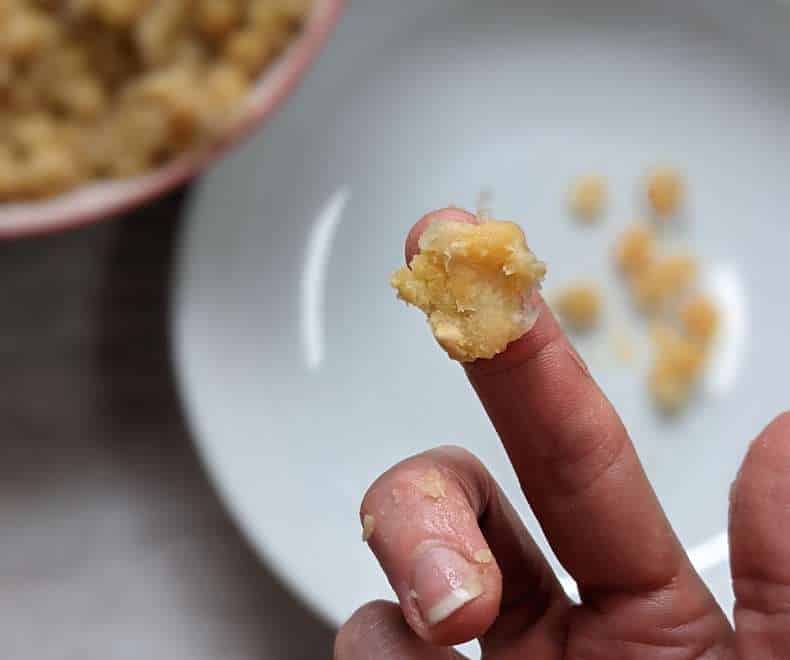
- Cooking the chickpeas: Overcooking the chickpeas just a bit so they can easily be smashed with your fingers.
- Removing the skins: Removing them gives the hummus an extra incredible texture.
- Ice cubes: Adding ice cubes to the food processor helps in whipping the hummus into a creamier texture.
- Baking soda: Adding baking soda to chickpeas can help them soften and cook more quickly and gives an extra creamy end result. Please don’t skip this step!
How to Make Israeli Hummus Step-by-step?
Step 1: Soak the chickpeas: Take dry chickpeas and place them in a large bowl. Add plenty of water and soak overnight (chickpeas will expand in the bowl). You can soak them for up to 48 hours but replace the water every 4-6 hours.
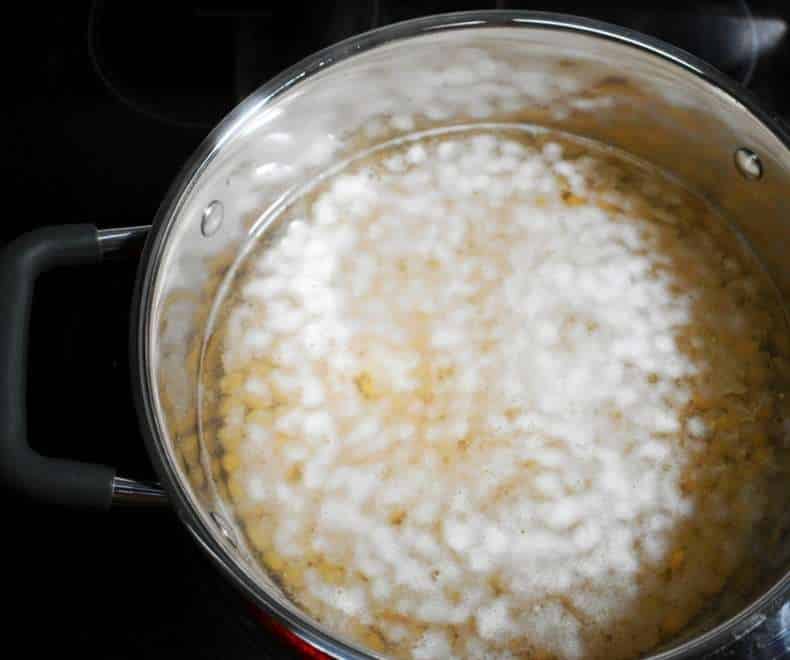
Step 2: Cook the chickpeas: When ready, drain the chickpeas and place them in a medium-sized heavy cooking pot. Cover with about 4 inches of water and stir in 1 teaspoon of baking soda. Bring to a boil.
IMPORTANT!
About 15-20 minutes into the cooking, you’ll notice that a sizable layer of foam forms along the top of the water. Reduce the heat to medium-low and use a ladle or a slotted spoon to scoop out the foam. Don’t leave the pot unattended! Scoop all the foam! It will take a few minutes until the foaming stops. Then, reduce the heat and simmer for 45 to 60 minutes (sometimes a little longer), ensuring there is always enough liquid. The chickpeas should soften so that they can be easily smashed with your fingers.
During simmering, the skins will crack and loosen and float to the top. Remove them with a slotted spoon. Stir the chickpeas, and more loosened skins will come to the top. Most of the skin can be removed this way!
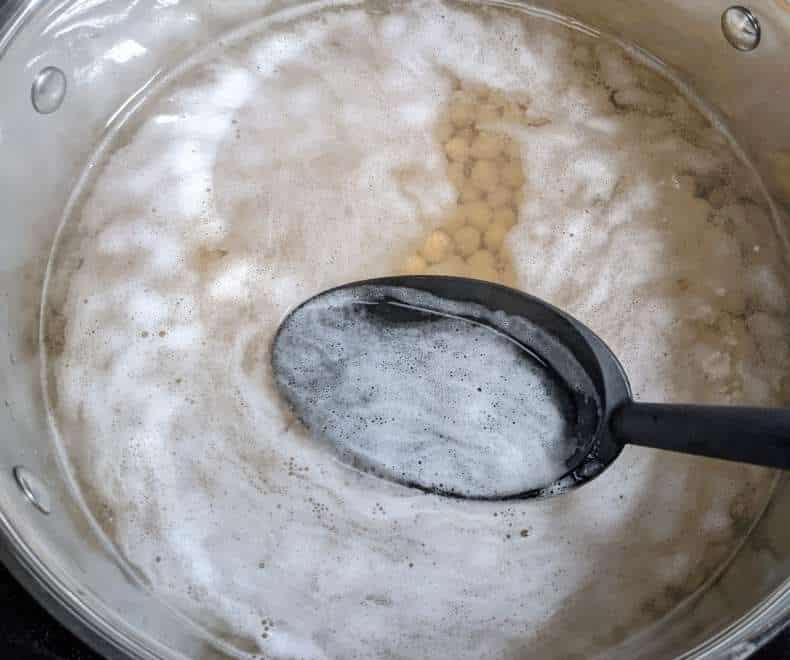
Drain, reserving about ½ a cup of the cooking water and 2 tablespoons of the chickpeas (for garnish).
Step 3: Peel the chickpeas: Peel them when they are cooled enough to handle. Discard skins. Let the chickpeas cool completely before using.
Measure 2 cups of cooked chickpeas, and store the leftovers (read my “How to Store Cooked Chickpeas” notes).
Step 4: Puree the chickpeas in a food processor: Add chickpeas, garlic, lemon juice, cumin, tahini, and salt. Run the processor until the chickpeas turn into a smooth powder-like paste.
Step 5: Add the chickpeas liquid (or water): While the food processor is running, add 2-3 ice cubes and slowly pour in ¼ cup of liquid. Check, and if the consistency is still too thick, run the processor and gradually add more liquid. Blend until you reach desired silky-smooth consistency. Taste! If needed, correct the flavors to your liking.
Step 6: Transfer to a serving bowl and garnish: Spread in a serving bowl, add a handful of chickpeas in the middle, drizzle with olive oil, and sprinkle with cumin and paprika.
How Do You Thicken Hummus?
If, for some reason, you ended up using more liquid than you should have, or if you still want a thicker consistency, you can add a bit more tahini. And if you chill the hummus for an hour or so before adding any garnish, that should help as well.
How to Store Leftover Cooked Chickpeas?
To Store: Cooked chickpeas can be drained of excess liquid and stored in an airtight container in the fridge for up to 3-4 days.
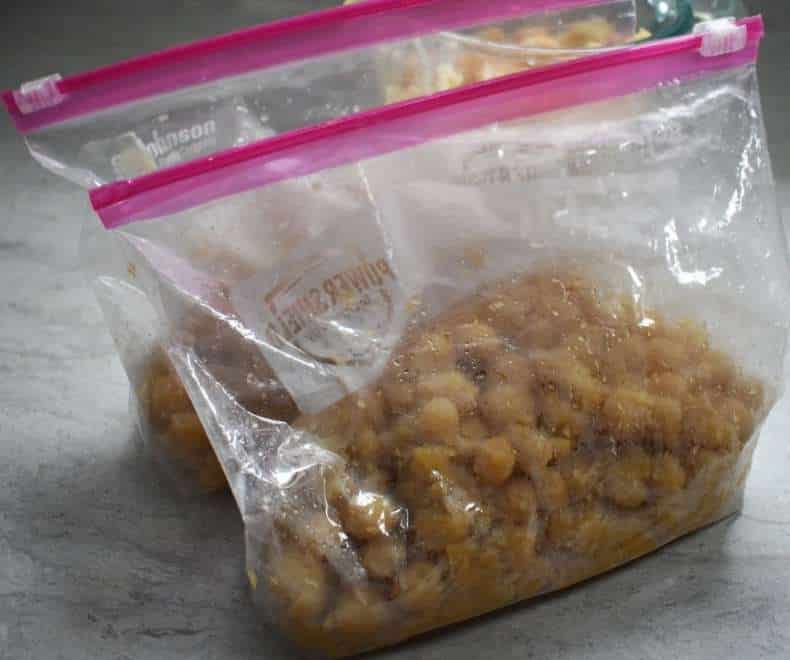
To Freeze: Leftovers can be thoroughly drained and frozen in freezer-safe bags or containers for up to 3-6 months. I put two cups of cooked chickpeas in each bag/container. Then, they are measured for the next time I will be craving fresh hummus.
How to Store Freshly Made Hummus?
Scoop the hummus into an airtight container and store in the fridge for 3 to 4 days.
I don’t recommend freezing hummus! Freezing and thawing can affect both the taste and texture of hummus.
Recipes You’ll Love

Israeli Hummus From Scratch
Description
Equipment
- Food processor
- Slotted spoon
- Lemon squeezer
Ingredients
- 2 cups of cooked chickpeas Option 1- cook 1 cup of dried chickpeas (180 grams), which yields about 2.5 cups of cooked chickpeas. Option 2- Cook 2.5 cups (1 pound / 454 grams) of dried chickpeas, which yields about 7-8 cups of cooked chickpeas, freeze the extras.
- 1 teaspoon (4 grams) baking soda
- 1-2 garlic cloves, peeled
- 3/4 cup (180 grams) tahini paste (raw tahini) Have an extra 1/4 cup of tahini on hand in case you'll need to thicken the hummus.
- 2-3 tablespoons (30-45 ml) fresh lemon juice
- 1/2-1 teaspoon ground cumin
- 1/4 teaspoon salt
- 2-3 ice cubes
For garnish:
- About 1/4 cup (60 ml) olive oil
- ground cumin
- paprika
- 1/4 cup chopped parsley
Instructions
Cooking the chickpeas:
- The night before, put the chickpeas in a large bowl and cover them with cold water. Leave to soak overnight.
- The next day, drain the chickpeas. Place a medium saucepan over high heat and add the drained chickpeas, plenty of water, and baking soda. Bring to a boil. Cook, skimming off any foam and any skins that float to the surface. The chickpeas will need to cook between 40 and 60 minutes, sometimes even longer. Once done, they should be very tender, breaking up easily when pressed between your thumb and finger.
- Reserve about ½ of chickpea liquid and 2 tablespoons of chickpeas for garnish.
- Drain the chickpeas and measure 2 cups.
The hummus:
- Add to a food processor cooked chickpeas, one garlic clove, ¾ cup of tahini, two tablespoons of lemon juice, ½ teaspoon of cumin, and salt. Run the processor until the chickpeas turn into a smooth powder-like paste.
- While the food processor is running, add 2-3 ice cubes and slowly pour in ¼ cup of liquid. Check, and if the consistency is still too thick, run the processor and gradually add more liquid. Blend until you reach desired silky-smooth consistency. Taste! If needed, correct flavors to your liking (add more lemon, cumin, tahini, and salt, if needed).
Serving:
- Spread in a serving bowl, add a handful of chickpeas in the middle, drizzle with olive oil, and sprinkle with cumin, paprika, and parsley.
- If you are not eating it straightaway, refrigerate until needed. Make sure to take it out of the fridge at least 30 minutes before serving.
Notes
- Cooking the chickpeas: Overcooking the chickpeas just a bit so they can easily be smashed with your fingers.
- Removing the skins: Removing them gives the hummus an extra incredible texture.
- Ice cubes: Adding ice cubes to the food processor helps in whipping the hummus into a creamier texture.
- Baking soda: Adding baking soda to chickpeas can help them soften and cook more quickly and gives an extra creamy end result. Please don’t skip this step!
Wow
The best, I miss Israel
Great post! Thank you
SO GOOD
Great tips thank you
i’ve been making home-made hummus for years. but this recipe put me in the big leagues. the texture came out amazing, and i’m guessing that the work-intensive peeling of the hummus after the cooking did it. definitely worth the time!
Yes, it takes a little effort but it totally worth it!