Once you try these homemade Hanukkah Decorated Cookies, they will definitely find a permanent place on your favorite cookie recipes list.
I think that the best kind of present is one that you can eat. These cookies make a great Hanukkah treat and a great addition to any Mishloach Manot for Purim (of course you’ll need a different cookie cutters and decorations).
*The full recipe is in the recipe card below
Ingredients Overview
All-purpose flour: Regular all-purpose flour forms the base of these cut-out butter cookies. Be sure to measure your flour carefully for the best texture.
Granulated sugar: For sweetness.
Butter: Unsalted, cold, and cut into cubes
Vanilla sugar: Sugar that has been infused with vanilla. You can purchase vanilla sugar in some specialty stores or make your own.
Egg: One large egg
How to Decorate Hanukkah Cookies?
These cookies are delicious on their own but taken to a whole new level when you add decorations.
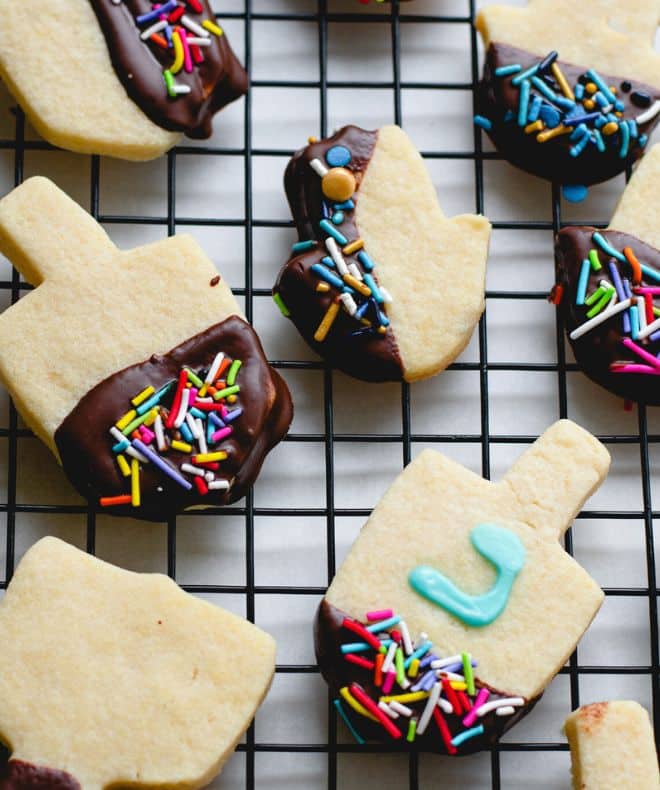
Option 1- Dip them in chocolate
Melt high-quality milk or dark chocolate with oil in the microwave, stopping to stir at least every 30 seconds. Dip half of the cookie in the melted chocolate, place it on the wire rack, and top it with sprinkles.
Option 2- Sprinkles or colored sugar:
Decorate with sprinkles or colored sugar before baking.
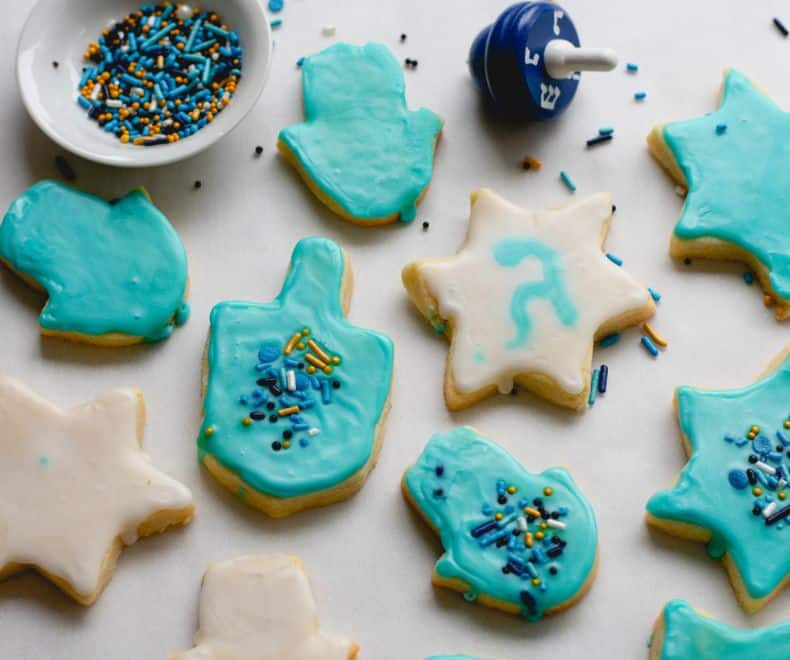
Option 3- Powdered Sugar Icing
Whisk milk, powdered sugar, and a few drops of food coloring (optional) until it’s a thick consistency. Then, using a teaspoon or a piping bag, frost the cookies and add some sprinkles if desired. Let the cookies sit for an hour at room temperature until the frosting dries and forms a thin crust.
FAQs
The cookies need to be completely cool to the touch before you store them.
Store cookies in an airtight container that’s not completely sealed at room temperature for up to 6 days.
Freeze baked and not glazed cookies in a sealed container for up to 2 months; defrost and bring to room temperature before glazing.
More Recipes You’ll Love
Mandel Bread (Mandelbrot) Jewish Cookies

Hanukkah Decorated Cookies
Description
Equipment
- Food processor
- Assorted cookie cutters
- Hamsa cookie cutter optional
- Parchment paper
- Baking sheet
Ingredients
- 2 1/2 cups (350 grams) all-purpose flour plus a little more for dusting
- 3/4 cup (150 grams) granulated sugar
- 2 Tablespoons (20 grams) vanilla sugar
- 1 stick+ 6 tablespoons (200 grams) cold butter cut into cubes
- 1 large egg
- sprinkles or colored sugar
*Optional* for the chocolate coating:
*Optional* for the powdered sugar icing:
- 1-2 Tablespoons (15-30ml) milk
- 1 cup (120 grams) powdered sugar
- a few drops of natural food coloring
Instructions
- Place flour, sugar, vanilla sugar, and egg in the bowl of a food processor. Process until the mixture is the texture of a coarse meal.
- Add the butter to the food processor. Process just until a dough forms. If the dough is too sticky, then add a spoonful of flour. If it is too dry, then add a spoonful of water.
- Flatten the dough into a disc and put it in a plastic bag. Refrigerate until chilled, about 1-2 hours.
- Preheat the oven to 320°F/160°C.
- Line two sheet pans with parchment paper.
- On a floured surface, roll out the dough to about a ½-inch (1 cm) thickness (relatively thick so that they do not break).
- Cut out as many cookies as possible and place them on prepared sheet pans. *If you choose to decorate with only sprinkles or colored sugar, do it before the cookies go into the oven.
- Bake for approximately 10-12 minutes, until golden at the bottom.
- Let cookies cool completely, preferably on a cooling rack.
- Once the cookies have cooled, you can move on to icing and decorating them!
*Optional* chocolate coating:
- In a small microwavable bowl, microwave chocolate and oil in 30 seconds intervals until melted and smooth. Dip half of each cooled cookie into melted chocolate. Decorate with sprinkles and place on waxed/parchment paper until the chocolate is set.
*Optional* sugar frosting:
- Whisk milk, powdered sugar, and a few drops of food coloring in a medium-sized bowl until it’s a thick consistency. Then, using a teaspoon or a piping bag, frost the cookies and add some sprinkles if desired. Let the cookies sit for an hour at room temperature until the frosting dries and forms a thin crust.
- Using a teaspoon or a piping bag, frost the cookies and add some sprinkles if desired. Let the cookies sit for an hour at room temperature (until the frosting dries and forms a thin crust).
- Serve them right away, or store them in airtight containers.
Notes
So cute. Happy Purim
Happy Purim
Looks amazing
These look amazing
Saving this
Fun activity with kids
It turned out great!
yay!
Great activity with kids
Great dough for cut out cookies
thank you