I was first introduced to Black and White Cookies on the Seinfeld television sitcom. In one of the episodes (the dinner party), Jerry and Elaine go to a bakery to pick up a babka. While waiting in line, Jerry enjoys a black and white cookie and sees it as a solution to the world’s problems.
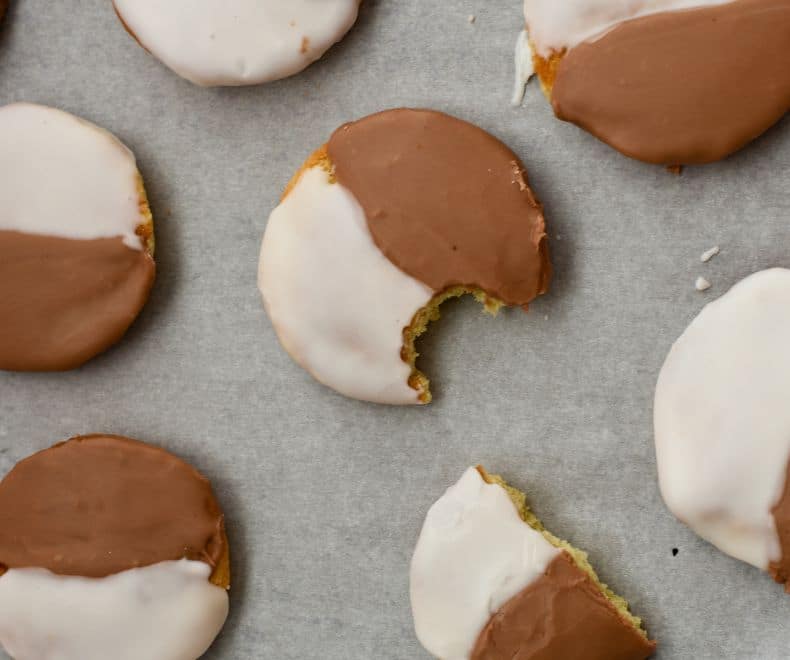
The cookies are a New York classic staple of the city’s bakeries and delis. They are frosted on one half with vanilla and on the other with chocolate. The cookies are actually more like small cakes; the texture is very soft and not crunchy.
Recently, I borrowed the cookbook “The Perfect Cookie” by “America’s Test Kitchen” from a local library. Of all the fantastic recipes, this black and white cookie recipe was the most eye-catching to me. These cookies are fun to make and fun to eat! The recipe is from the book with minor changes.
So… chocolate first, or vanilla?
What are Black and White Cookies?
Black and White Cookies, also known as Half-Moon Cookies, are the best of both worlds! They’re halfway between a cake and a cookie, with a thick layer of icing flavored with both vanilla and chocolate. They also have a hint of lemon flavor.
Ingredients Overview
Before you start baking using this cookie recipe, measure and prepare your ingredients so the cooking process will go smoothly and easily.
All-purpose flour: All-purpose regular flour is perfect for this cookie recipe.
Sour Cream: Use full-fat sour cream at room temperature. The sour cream creates that iconic texture. It also reacts with the baking soda to produce enough lift in the cookies.
Butter: Unsalted and softened to room temperature. Allow the butter to sit out on the counter for about 1-2 hours before starting your recipe. The amount of time depends on the weather and how cool you keep your kitchen.
Vanilla: For the best flavor, use real vanilla extract.
Lemon zest: Adds tangy flavor to the recipe.
Egg: Large, at room temperature.
Dark chocolate: Semi-sweet or bitter-sweet, melted.
How to Make Black and White Cookies Step by Step
Step 1: Whisk dry ingredients.
Step 2: Mix wet ingredients.
Step 3: Add dry ingredients to wet ingredients in 3 additions, alternating with sour cream.
Step 4: Use a ¼ cup scoop or greased measuring cup to drop balls of batter onto your lined baking sheets. Space them further apart on the baking trays than you normally would; only place six cookies on a tray. Bake, and let the cookies cool completely.
Step 5: Make the icing by combining the confectioners’ sugar, vanilla, and boiling water, in a large bowl, then mix until smooth, adding more water as needed to get a thinner spreadable icing. Transfer ½ of the vanilla icing to a separate bowl. Whisk in the melted chocolate.
If the icing is too thick, add more water. Whisk in more confectioners’ sugar if it’s super thin and watery.
Step 6: On the flat side of the cooled cookies, spread vanilla icing on one half and draw a line down the middle with an offset spatula or knife to get a nice clean edge. Refrigerate for 15 minutes. Then spread chocolate icing on the other half and refrigerate for 1 hour until completely set.
How to Store Black and White Cookies
Black and white cookies are best eaten the same day they are baked. They can be stored in an airtight container at room temperature for up to 3 days, or in the refrigerator for up to 7 days.
Jewish Recipes You’ll Love
Vegetarian Matzo Ball (Kneadelech) Soup

Half Moon- Black and White Cookies
Description
Equipment
- Standing mixer with a guitar hook (flat beater)
- 1/4 cup cookie scoop OR 1/4 cup measuring cup
- 2 Baking sheet
- Parchment paper
- Offset spatula
- Cooling rack
Ingredients
For the cookies:
- 1 3/4 cups (220 grams) all-purpose flour
- 1/2 Teaspoon baking powder
- 1/4 Teaspoon baking soda
- 1/4 Teaspoon salt
- 10 Tablespoons (150g) unsalted butter softened to room temperature
- 1 cup (200 grams) granulated sugar
- 1 large egg at room temperature
- 2 Teaspoons vanilla extract
- 1/3 cup (80 grams) full-fat sour cream at room temperature
- 1 Teaspoon finely grated lemon zest very recommended!
For the icing:
- 4-5 cups (480 – 600g) confectioners’ sugar, sifted
- boiling water, as needed about 7-10 tablespoons
- 1 ounce (30g) dark chocolate melted
- 1 Teaspoon vanilla extract
- a pinch of salt
Instructions
The cookies:
- Preheat the oven to 350°F/180°C.
- Line two baking sheets with parchment paper.
- Whisk flour, baking powder, baking soda, and salt together in a bowl and set aside.
- In the bowl of a stand mixer fitted with the paddle attachment, cream together butter and sugar for about 3 minutes on medium speed until pale and fluffy. Scrape down the sides of the bowl with a spatula as needed.
- Add egg, lemon zest, and vanilla, and beat until combined.
- Add the dry ingredients mixture and sour cream in three alternating batches starting and ending with the flour while mixing on low. Give the batter a final stir by hand to ensure everything is well combined.
- Use a ¼ cup scoop or greased measuring cup to drop balls of batter onto your prepared baking sheets. Space them further apart on the baking trays than you normally would; only place six cookies on a tray.
- Bake for 13 to 15 minutes or until the centers are springy to the touch and the edges are lightly browned.
- Let them cool on the baking sheet for 5 minutes, then transfer them to a wire rack.
- Let the cookies cool completely before icing, or the icing will melt.
- Keep in mind that you are icing the flat side and not the rounded side of the cookies.
Make the icing:
- Sift the confectioners' sugar into a bowl and measure 4 cups (480 grams).
- In a large bowl, add the sifted sugar, vanilla, and salt. Stir in the boiling water one tablespoon at a time, mixing vigorously until the mixture is spreadable but still thick. ** If it’s too thick, add more water. If it’s super thin and watery, mix in more confectioners’ sugar**
- Transfer half of the icing to another mixing bowl, stir in the melted chocolate and whisk until smooth and very thick but still spreadable.
Assemble:
- Spread vanilla icing on one half and draw a line down the middle with an offset spatula or knife to get a nice clean edge. Refrigerate for 15 minutes. Then spread chocolate icing on the other half and refrigerate for about an hour or until completely set.