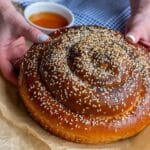
Round Challah
Yield 1 loaf
Print
Pin Recipe
Description
The round Challahs have no end, symbolizing (and actualizing) the wish for a year in which life and blessings continue without end.Kosher, Pareve (vegan option too!)
Equipment
- Rolling pin optional
- Instant read food thermometer highly recommended
Ingredients
- 3 and 1/2 cups (500g) sifted all-purpose flour plus a little more for dusting I strongly recommend sifting the flour; it will result in a more delicate dough with a more significant volume.
- 1 Tablespoon (10g) active dry yeast
- 1/4 cup (60ml) canola oil plus a little more for greasing
- 3 Tablespoons (30g) granulated sugar or 3 tablespoons of honey
- 1 and 1/4 to 1 and 1/2 cups (300-350ml) lukewarm water you want the water warm. Not hot. Not cold. Not freezing. Just warm.
- 1/2 Teaspoon salt
For brushing:
- 1 egg
- 1 Tablespoon (15ml) olive oil
- 1 Tablespoon (10g) granulated sugar
For brushing- vegan:
- 2 Tablespoons (30ml) real maple syrup
- 1 Tablespoon (15ml) olive oil
Optional for garnish
- 2 Tablespoons sesame seeds or poppy seeds
Instructions
- In the bowl of a standing mixer, put flour and yeast (or in a large mixing bowl if kneading by hand) and mix/stir on a low speed for one minute.
- Add oil and sugar and mix for about one minute.
- While the mixer is working, slowly add water and mix to form the dough.*Because each flour is different, stored differently, and has different absorption capacities, the amount of liquid will almost always change. Even if you always use the same flour, it may be that on different days, the flour will absorb more liquid than before. So, start with half a cup of water and gradually add enough until the dough is soft but not sticky. Dough that lacks liquid will be stiffer and much less comfortable to work with. The water temperature should be warm.
- Add the salt and knead the dough for 10-15 minutes (It helps the gluten form and the dough to be elastic with better structure).
- Grease the dough with a little bit of oil, cover with a kitchen towel or loosely with saran wrap and let the dough rise until doubled (place the bowl somewhere warm). It takes between 1-3 hours at room temperature.
- Roll the dough into a long rope. If the dough is sticky add a *little bit* of flour. When making Challah, less is more!
- Spiral it around itself until you reach the end. Tuck the end under the bread.
- Line a baking sheet with parchment paper and place the Challah on it.
- Place the pan somewhere warm, cover with a towel, and let it rise until puffed, about an hour.
- Heat the oven to 400°F/200°C.
- Whisk the topping ingredients and when ready to bake and brush it all over the Challah.
- Sprinkle on sesame seeds.
- Slide the Challah on its baking sheet into the oven and bake for 30 to 40 minutes. The Challah is done when it is a rich golden brown and registers 190°F/90°C in the very middle with an instant-read thermometer. If the crust is browning too rapidly, you can tent the Challah with aluminum foil. This will shield the outer layer from direct heat and slow down the browning process, giving the interior more time to cook.
- Let the Challah cool on a cooling rack.
Notes
- If your Challah is browning too quickly while baking: Tent the Challah with aluminum foil. Place the foil gently over the challah, making sure it doesn't stick to the dough.
- Checking the dough internal temperature: In the oven, due to its distinctive shape, the outer layer of the dough tends to brown rapidly, potentially giving a misleading impression of doneness. Relying solely on visual cues may result in an undercooked interior. Therefore, the internal temperature serves as a more precise and reliable indicator of the bread's readiness. This practice ensures that the Challah is thoroughly baked. The internal temperature should be in the range of 190-210°F (87-99°C).
- Mixing the dough: Scrap the sides of the bowl occasionally with a rubber spatula to ensure all ingredients are incorporated.
- Water: Because each flour is different, stored differently, and has different absorption capacities, the amount of liquid will almost always change. Even if you always use the same flour, it may be that the flour will absorb more liquid on different days. So, start with half a cup of water and add as needed gradually. The dough should be very soft but not sticky. Dough lacking in liquid will be stiffer and less comfortable to work with.
Tried this recipe? Tag@mamalivingabroad